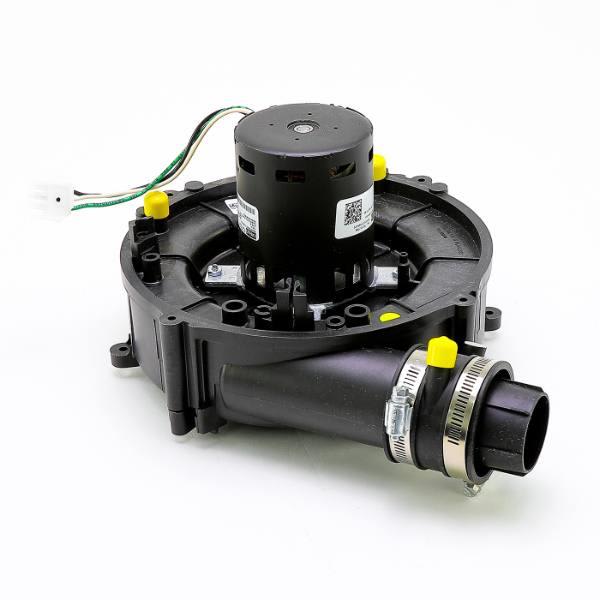
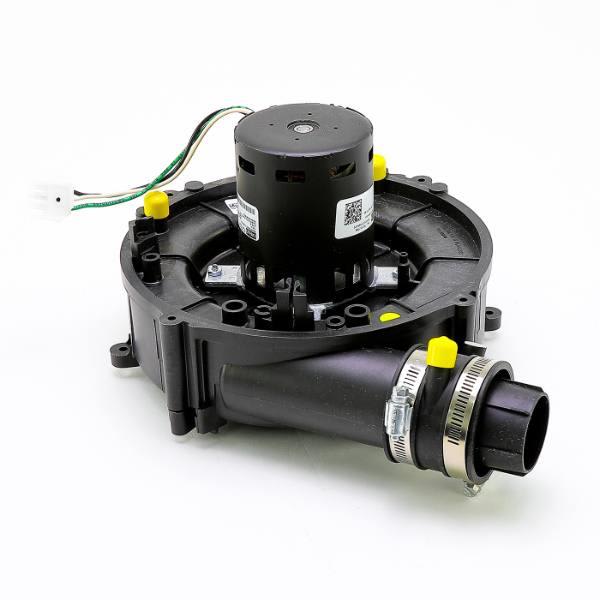
If your Rheem or Ruud gas furnace refuses to fire up, throws a pressure switch error, or runs noisily during the venting cycle, a failing draft inducer motor is usually the cause. To restore safe combustion airflow and exhaust venting, the Rheem Furnace Draft Inducer Motor OEM Replacement (SP20166) is the professional-grade solution required to restore safe venting and get your heat back online.
For those troubleshooting broader system timing issues, checking our Honeywell Home ST9400C review for the Honeywell Home Universal Electronic Furnace Fan Timer Control Board is also a critical step in the diagnostic process.
Top Pick: Rheem Furnace Draft Inducer Motor OEM Replacement (SP20166)
Score: 9.8/10 — The gold standard for compatible Rheem/Ruud systems, offering a perfect mechanical fit and guaranteed safety specifications.
Rheem Furnace Draft Inducer Motor OEM Replacement
The Rheem Furnace Draft Inducer Motor OEM Replacement is not just a motor; it is a complete inducer assembly designed for seamless integration.
In the hierarchy of furnace components, the draft inducer is the "first responder" of the heating cycle. Before a single spark is ignited or a valve opens, the SP20166 must energize to clear the combustion chamber of residual gases and create a vacuum that pulls fresh air into the burners. Because this part is an Original Equipment Manufacturer (OEM) replacement, it is calibrated to the exact cubic feet per minute (CFM) requirements of the furnace's pressure switch.
For homeowners, the primary appeal of the SP20166 is the elimination of "field modification." Universal motors often require the user to drill new mounting holes or use improvised gaskets to create a seal. In a combustion system, an imperfect seal can lead to carbon monoxide leaking into the living space. By choosing the OEM SP20166, you ensure that the housing, the impeller, and the motor mount align perfectly with the heat exchanger's collector box, maintaining the airtight integrity of the exhaust path.
This motor is engineered for high-heat environments and the corrosive nature of combustion byproducts. The bearings are sealed to prevent dust and soot from causing premature wear, and the motor windings are insulated to withstand the temperature fluctuations found in a furnace cabinet. Whether you are dealing with a completely seized motor or one that has become so noisy it disrupts your sleep, the SP20166 provides a factory-fresh restoration of your HVAC system's safety and efficiency.
Pros
- True drop-in fit with original mounting holes and wiring
- Exact match for OEM CFM and pressure switch trigger points
- High-grade sealed bearings for long-term reliability
- Maintains the safety integrity of the exhaust venting system
- Includes the necessary housing and gasket for a complete swap
Cons
- Higher price point than generic "universal" aftermarket kits
- Strict compatibility: only fits specific Rheem/Ruud model families
- Requires basic electrical knowledge for safe installation
| Feature | Specification |
|---|---|
| Part Number | SP20166 |
| Brand | Rheem / Ruud (OEM) |
| Component Type | Draft Inducer Motor Assembly |
| Application | Gas Furnace Combustion Venting |
| Voltage | Standard Furnace Line Voltage |
| Installation Type | Direct OEM Swap |
| Average Install Time | 30–60 Minutes |
Deep Dive: How the Draft Inducer Works
To understand why the SP20166 is critical, one must understand the "Sequence of Operation" in a modern gas furnace. When your thermostat calls for heat, the system follows a strict safety protocol to ensure the environment is safe for ignition.
Pro Tip: For advanced control over your furnace's sequence of operation, consider the Honeywell Home Universal Electronic Furnace Fan Timer Control Board.
If you are upgrading your system's timing, our detailed Honeywell Home ST9400C review explains if a universal timer fits your specific needs.
1. Inducer Activation: The control board sends power to the SP20166. The motor spins the impeller, which is a centrifugal fan designed to move high-pressure air. This creates a vacuum in the heat exchanger and pushes air up the vent pipe.
2. Pressure Verification: The airflow created by the motor pushes air through a small plastic tube to the pressure switch. If the motor is spinning fast enough and the vent pipe is clear, the air pressure closes the switch. This acts as a "proof of flow" mechanism.
3. Ignition: Only after the pressure switch confirms "safe venting" does the White-Rodgers Universal Integrated Furnace Ignition Control Board energize the igniter and open the gas valve. If the SP20166 fails to reach the required RPM, the switch stays open, and the burners never light.
4. Exhaust Cycle: The SP20166 continues to run throughout the entire heating cycle, ensuring that carbon monoxide and other combustion gases are pushed out of the home and not allowed to seep back through the cabinet.
If the SP20166 motor is failing—perhaps the bearings are worn, causing it to spin too slowly—the pressure switch will never close. The furnace will "lock out," and you will see a flashing LED error code on the control board. This is a critical safety feature; without a functioning inducer, lighting the burners would cause deadly gases to back up into your home.
Comprehensive Troubleshooting: Is it the Motor or Something Else?
Before purchasing the SP20166, it is vital to distinguish between a failed motor and a failed peripheral component. Many homeowners mistakenly replace the motor when the issue is actually a $15 pressure switch, a failing Carrier Bryant Payne Furnace Hot Surface Igniter Replacement, or a blocked vent.
The Auditory Test: Turn on your thermostat and listen closely to the furnace. If you hear a loud humming sound but no air is moving, the motor is likely seized (mechanical failure). If you hear a high-pitched squealing or grinding, the bearings have failed. However, if the motor sounds perfectly smooth and is spinning rapidly, but the furnace still won't ignite, the motor is likely fine, and the problem lies with the pressure switch, the tubing, or the vent line.
The Visual Inspection: Open the cabinet and watch the impeller. If it is wobbling or if there is visible rust and "pitting" on the blades, the motor's efficiency is compromised. Check for "slugging"—where the motor starts slowly and then catches. This often indicates a failing capacitor or winding degradation within the motor. In some cases, electrical failures extend to the Packard 2-Pole 30-Amp HVAC Contactor 120V Coil, which should also be inspected for pitting or burnt coils. Also, check for any foreign objects (like bird nests or debris) that may have fallen into the housing.
The Vent Obstruction Check: In winter, snow or ice can block the exterior vent termination. In summer, birds may build nests in the flue. If the vent is blocked, the SP20166 will spin perfectly, but the pressure switch will detect a "blocked" condition and prevent ignition. Always check your external exhaust pipes before replacing the internal motor.
WARNING: Never bypass the pressure switch to "force" the furnace to run. This disables the primary safety mechanism and can lead to carbon monoxide poisoning.
Step-by-Step Installation Guide for the SP20166
Replacing the draft inducer is a moderate-level DIY task. While it does not require specialized HVAC tools, it does require a strict adherence to safety protocols regarding electricity and gas.
Phase 1: Preparation and Safety
The most critical step is the total removal of energy. Turn off the furnace power switch (usually a toggle switch on the side of the unit) and shut off the circuit breaker safely at home at the main panel (if you're upgrading your electrical system, compare Square D vs Eaton circuit breakers for better reliability). While not strictly required for a motor swap, turning off the gas supply valve provides an extra layer of safety when working deep inside the combustion chamber. Ensure you have a nut driver set and a clean rag ready.
Phase 2: Disassembly
Locate the SP20166 assembly. It is typically found at the top of the heat exchanger. Using a screwdriver or nut driver, disconnect the wiring harness. Pro Tip: Take a clear photograph of the wires before removing them. Many furnaces have similar-looking wires, and crossing the ground or the hot lead can blow the control board.
Carefully disconnect the rubber vacuum tubing leading to the pressure switch. Do not pull by the tube; instead, gently squeeze the clamp and slide it off the nipple. Finally, remove the mounting screws that secure the inducer housing to the furnace chassis. Be careful as you lift the old unit; it may be heavy and coated in soot.
Phase 3: Surface Cleaning and Gasketing
Once the old motor is removed, you will see the mating surface where the inducer meets the heat exchanger. This area often has remnants of the old gasket. Use a plastic scraper to remove any debris. If you install the new SP20166 over old gasket material, you will create a leak. Flue gas leaks are dangerous and can trigger the furnace's safety sensors or leak into the home.
Phase 4: Installing the New SP20166
Place the new gasket onto the mating surface. Position the SP20166 assembly and align the mounting holes. Tighten the screws in a "star pattern" (like lug nuts on a car wheel) to ensure the gasket is compressed evenly across the entire surface. Reconnect the wiring harness and the pressure switch tubing, ensuring the tubing is seated firmly and the clamps are tight.
Phase 5: Testing and Verification
Restore power and gas. Set the thermostat to call for heat. You should hear the SP20166 engage immediately with a smooth, quiet whirring sound. Within seconds, the burners should ignite. Stay with the unit for at least two full cycles to ensure no leaks are present and the motor doesn't exhibit any erratic behavior.
Long-Term Maintenance and Lifespan Extension
A high-quality OEM motor like the SP20166 can last 15 years if the environment is managed. To prevent premature failure, follow these maintenance protocols:
- Air Filter Discipline: While the inducer isn't the main blower, a clogged return filter (maintain clean airflow to reduce system stress (for broader home air quality and moisture control, see our GE ADEL50LZ dehumidifier guide)) increases the overall static pressure and heat load within the cabinet, which can indirectly stress all electrical components.
- Cabinet Sealing: Ensure the furnace access panels are screwed tight. If the cabinet is "leaky," the inducer has to work harder to maintain the required vacuum, leading to more runtime and faster wear.
- Soot Management: Every few years, a technician should inspect the heat exchanger for soot buildup. Heavy soot can migrate into the inducer impeller, unbalancing the motor and causing the "death wobble" that destroys bearings.
- CO Monitoring: Install a UL-listed carbon monoxide detector within 10 feet of the furnace. For integrated home monitoring, consider an ADT Self Setup security kit. This is the only way to truly verify that your inducer and venting system are operating safely. To protect the surrounding environment from corrosion, check out our GE ADEL50LZ dehumidifier guide. For comprehensive basement protection, we also recommend our Basement Watchdog BW1033 guide or reviewing the Ridgid SP-650C sump pump guide to keep your utility area dry.
Detailed Comparison: OEM vs. Universal Aftermarket
When searching for an inducer motor, you will likely encounter "Universal" options that claim to fit multiple brands. While cheaper, these carry significant risks compared to the SP20166.
| Feature | Rheem SP20166 (OEM) | Universal Aftermarket |
|---|---|---|
| Fitment | Perfect / Drop-in | Requires modification/brackets |
| Airflow (CFM) | Factory Calibrated | Approximate / Variable |
| Installation | Simple (30-60 mins) | Complex (2-4 hours |
| Safety | Certified for Model | Unverified for specific model |
| Cost | Higher | Lower |
| Warranty | Preserves Unit Warranty | May void manufacturer warranty |
The Engineering Behind the SP20166
To the untrained eye, the SP20166 looks like a simple fan attached to a motor. However, the engineering of a draft inducer is highly specialized. Unlike a room fan or the specialized fans found in Pioneer mini-split heat pumps (which are often more efficient for zoned heating)—which offer a modern alternative to traditional forced-air systems—which move large volumes of air at low pressure, the SP20166 is a high-static pressure device. It must fight against the resistance of the heat exchanger and the vertical climb of the exhaust flue.
The impeller is designed with a specific blade pitch to ensure that it creates enough vacuum to overcome "atmospheric back-pressure." If you are considering a transition to more efficient cooling and heating, see our Bosch BMS500-18HDN1 Mini-Split Heat Pump Buying Guide or explore the MrCool DIY Mini-Split options for a homeowner-friendly installation. If the blade pitch were slightly off—as is often the case with generic clones—the motor might spin, but it wouldn't move enough air to trip the pressure switch. This results in the "infinite loop" failure where the motor runs but the furnace never ignites.
Furthermore, the housing of the SP20166 is cast from materials that resist thermal expansion. Because the motor sits directly atop the heat exchanger, it is subjected to extreme temperature swings. Cheap housings can warp, leading to air leaks at the gasket. The OEM construction ensures that the housing remains rigid, keeping the seal tight and the combustion gases moving in one direction: out of the house.
Common Pitfalls When Replacing Inducer Motors
Even experienced DIYers can make mistakes that lead to inefficient operation or premature failure of the new part. Here are the