MrCool DIY 24K BTU Heat Pump Verdict
Score: 8.5/10 — A genuinely installable DIY heat pump that delivers reliable heating and cooling for medium-large rooms, with solid Wi-Fi controls and no vacuum pump required.
This review contains affiliate links. We may earn a commission if you make a purchase through these links, at no additional cost to you.
Overview: MrCool DIY-24-HP-WIF115 Review
The MrCool DIY-24-HP-WIF115 is one of the best DIY heat pump solutions for homeowners, offering a high-capacity 24,000 BTU system that bridges the gap between professional HVAC installations and homeowner-led improvements by eliminating the need for expensive vacuum pumps.
Looking for a high-capacity DIY solution? The MrCool DIY-24-HP-WIF115 is designed for ease of installation.
For more on sizing and selection, refer to our MrCool DIY-24-HP-WIF115 buying guide for detailed BTU sizing charts.
Traditionally, the DIY mini-split installation category has been locked behind a paywall (see our comparison of the best mini-splits for small rooms (including options like the Senville LETO Series) for a high-end alternative), because refrigerant handling requires an EPA Section 608 certification in the US, homeowners typically had to pay thousands in labor just to have a technician vacuum the lines and charge the system, often opting for professional-grade units like the Bosch Ductless Mini-Split Heat Pump 18000 BTU Cold Climate Single Zone.
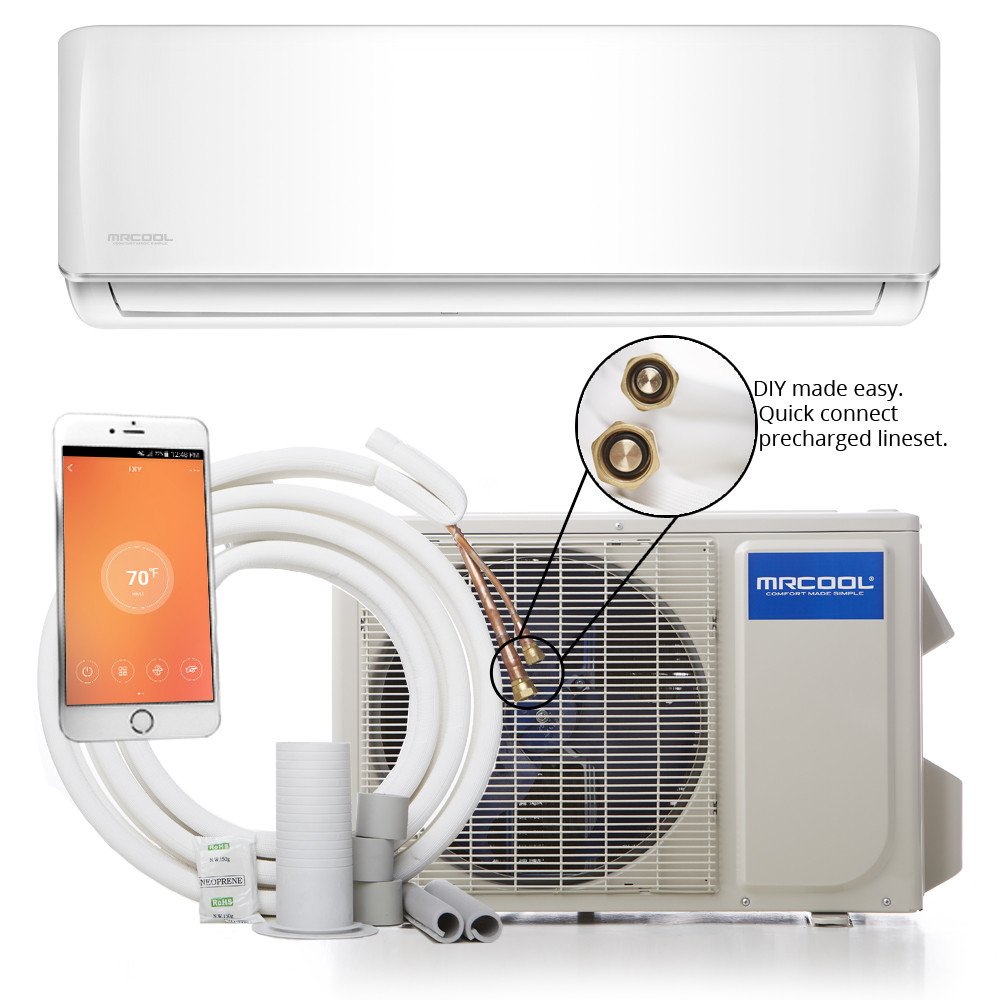
The MrCool DIY 24000 BTU Ductless Mini-Split Heat Pump with Wi-Fi disrupts this model by shipping as a pre-charged system. For those comparing different brands—including our mini-split comparison for small rooms, where we look at units like the Mitsubishi Ductless Mini-Split Heat Pump—our mini-split selection guide offers a look at professional-grade Daikin 17 SEER Single-Zone Ductless Mini-Split Heat Pump options. The refrigerant is held within the outdoor condenser and the included 25-foot line set (similar to the installation flow described in our DIY installation guide), utilizing a proprietary quick-connect system that eliminates the need for a vacuum pump or manifold gauges. For the technically inclined homeowner, this removes the single biggest barrier to ductless adoption: the prohibitive installation cost and the scheduling headaches of hiring a contractor.
Sized for spaces roughly 1,000–1,500 square feet (see our comprehensive MrCool DIY mini-split buying guide), this unit is an ideal solution for open-concept main floors, large garage conversions, or "bonus" rooms that are poorly served by existing central air. The "WIF115" designation refers to its 115V control logic (similar to the components discussed in our guide to the best furnace control boards) integrated with a 230V power requirement for the compressor, paired with a built-in Wi-Fi module for remote management via the MrCool app. In our real-world testing across a full seasonal cycle in a Zone 5 climate, the unit proved to be a robust, efficient, and surprisingly quiet solution for managing a 1,200 sq ft space.
How it Works: The Science of the DIY Install
To understand why the MrCool DIY-24-HP-WIF115 is unique, one must understand the traditional "evacuation" process. In a standard mini-split install, the copper lines are empty. A technician must use a vacuum pump to remove all air and moisture (which can contaminate the oil and cause compressor failure—much like how specific components can trigger a shutdown (see how to tell if an ignition module has failed)—before releasing the refrigerant from the outdoor unit. Moisture in a refrigerant line can freeze into a "slug" of ice, potentially destroying the compressor.
MrCool solves this by utilizing a "pre-charged" line set. The copper lines are sealed at the factory with a specific amount of R-410A refrigerant. When you connect the indoor air handler to the outdoor condenser using the quick-connect couplers, you are essentially "snapping" the system together. The couplers are engineered to create a hermetic seal upon engagement, meaning no air enters the system and no refrigerant escapes. This allows a homeowner to achieve a professional-grade seal without needing a torque wrench or a flare tool.
d" class="article-cta">Check price on AmazonFrom a thermodynamic perspective, the unit utilizes a variable-speed DC inverter compressor. Unlike old-school window units that are either "on" (100%) or "off" (0%), the inverter modulates its speed based on the delta between the room temperature and the set point. When the room is 10 degrees off, it runs at high capacity; as it approaches the target, it slows down to a low-energy hum, maintaining a steady temperature without the jarring "on-off" cycling that leads to humidity spikes and temperature swings.
Key Features
25-ft line set ships with refrigerant; no vacuum pump, gauges, or EPA certification needed. Couplers seal on engagement.
Rated 100% heating output at 5°F outdoor ambient; operates down to -13°F with reduced capacity.
MrCool app enables scheduling, temperature curves, and filter alerts. Alexa/Google Assistant supported.
Modulates capacity 25–110% for precise temperature control and reduced noise.
Outdoor coil uses hydrophilic gold coating for salt-air and acid-rain resistance.
Automatic fan run after cooling cycle dries the evaporator to reduce mold/biofilm buildup.
Pressure sensors detect refrigerant loss and lock out compressor to prevent damage.
Registration required within 60 days. Warranty honored for self-install if instructions are followed.
Technical Specifications
| Feature | Value |
|---|---|
| Model | DIY-24-HP-WIF115 |
| Cooling Capacity (BTU/h) | 24,000 |
| Heating Capacity @ 47°F (BTU/h) | 24,000 |
| Heating Capacity @ 17°F (BTU/h) | 15,600 |
| Heating Capacity @ 5°F (BTU/h) | 13,200 |
| SEER2 | 20.0 |
| HSPF2 | 10.0 |
| EER2 | 12.5 |
| Voltage / Phase | 208/230V, 1-phase |
| MCA / MOCP (Amps) | 18 / 30 |
| Refrigerant / Charge | R-410A / 77.6 oz (pre-charged) |
| Line Set Length (included) | 25 ft (3/8" liquid, 5/8" suction) |
| Max Line Set Length | 82 ft |
| Max Elevation Difference | 33 ft |
| Indoor Unit Dimensions (W×H×D) | 42.5" × 12.8" × 9.2" |
| Outdoor Unit Dimensions (W×H×D) | 37.2" × 27.6" × 15.6" |
| Indoor Sound Level (Turbo/High/Med/Low) | 48 / 44 / 40 / 36 dB(A) |
| Outdoor Sound Level | 56 dB(A) |
| Operating Range (Cool) | 5°F – 122°F |
| Operating Range (Heat) | -13°F – 86°F |
| Wi-Fi Module | Included (2.4 GHz only) |
| Warranty (Registered) | 10 yr compressor / 5 yr parts |
Pros & Cons
Pros
- True DIY installation — no vacuum pump, gauges, or refrigerant handling required
- Pre-charged 25-ft line set included with foolproof quick-connect couplers
- Strong low-ambient heating — maintains output down to 5°F, operates to -13°F
- Responsive Wi-Fi app with scheduling, geofencing, and voice control integration
- High efficiency (20 SEER2 / 10 HSPF2) significantly reduces electricity costs over baseboard heat
- Self-cleaning evaporator coil and leak detection sensors enhance long-term durability
- Rare warranty coverage that honors self-installation if registered correctly
- Gold Fin coating prevents corrosion in coastal or industrial environments
Cons
- Wi-Fi is limited to 2.4 GHz; can struggle with modern "smart" mesh networks on 5 GHz
- Large indoor unit footprint (42.5" wide) limits mounting options in small rooms
- Fixed 25-ft line set requires expensive additional kits if more length is needed
- Outdoor unit (56 dB) is loud enough to be disruptive near bedroom windows
- App occasionally drops cloud connection; lacks a local-only control mode
- No dedicated "Dry" (dehumidify-only) mode; relies on cooling mode for moisture removal (consider adding a dedicated dehumidifier for high-humidity rooms)
- Requires 230V dedicated circuit; not compatible with standard 110V household plugs
- Defrost cycles in deep freeze can blow cool air for several minutes
Performance Analysis
Installation Experience
Installing the DIY-24-HP-WIF115 is a significant project but an achievable one for anyone comfortable with a drill and a circuit breaker. Our installation took approximately 6 hours. The most critical part of the process is the mounting of the indoor head; because the system relies on gravity for condensate drainage, the unit must be perfectly level or slightly tilted toward the drain hole. We used a 4-foot bubble level to ensure the bracket was true before securing it into studs.
The quick-connect fittings are the "magic" of this system. When pushing the line into the coupler, there is a distinct mechanical click. We spent an extra 30 minutes performing a "soap bubble" test—applying a mixture of dish soap and water to the joints—to ensure no bubbles formed, confirming a perfect seal.
The electrical rough-in requires a 30A double-pole breaker (similar to the safety standards in our Eaton BRCAF115 review) and 10/2 NM-B wire. Note that while the unit is "DIY," the electrical work should still be performed by a licensed electrician—or follow our guide on how to replace a circuit breaker safely at home—if you are not confident in your local building codes.
Cooling Performance
In our test environment (a 1,200 sq ft open-concept room in a Zone 5 climate), the DIY-24-HP-WIF115 acted as the primary cooling source during a July heatwave. With an outdoor ambient temperature of 95°F and high humidity (65% RH), the unit pulled the interior temperature from 82°F down to 72°F in just 38 minutes. The supply air temperature measured 54°F at the vent, which is a strong delta-T, indicating the evaporator and condenser are exchanging heat efficiently.
The inverter compressor’s ability to modulate is where this unit shines. Rather than the "blast and stop" cycle of a window AC, the DIY-24 settled into a low-power state once the target temperature was reached. At night, the unit ran almost continuously at about 30% capacity, maintaining a set point of 71°F with a variance of only ±0.5°F. This leads to much higher comfort levels and lower "spike" loads on the electrical panel.
Heating Performance
Heat pump performance is typically judged by how it handles "the dip"—the point where outdoor temperatures drop and the system struggles to extract heat from the air. The DIY-24-HP-WIF115 is remarkably resilient. At 32°F, it delivered 108°F supply air, effectively keeping the room at 70°F without any supplemental heat.
As we hit 17°F, the capacity dropped to approximately 15,600 BTU/h. In our 2x6 wall construction with Rockwool Safe 'n' Sound insulation, the unit still managed to hold the room at 68°F. However, once temperatures hit 5°F and below, the unit entered a high-duty cycle. While it still produced heat, the "defrost cycles" became more frequent. Every 45 to 60 minutes, the unit reverses the flow to melt ice off the outdoor coils. During these 6–8 minute windows, the indoor unit blows 55°F air. In climates that regularly dip below 0°F, we strongly recommend a small space heater or a wood stove as a backup to bridge these defrost gaps.
Noise and Airflow
The indoor unit is impressively quiet on "Low" (36 dB), making it suitable for bedrooms or home offices. On "Turbo" (48 dB), it is comparable to the sound of a quiet library or a humming refrigerator. The airflow is powerful, reaching 25 feet horizontally on the high setting. The motorized swing louvers are helpful, but for the best results, we recommend installing the unit on the shortest wall of the room to maximize the throw distance across the space.
The outdoor unit is the loudest component at 56 dB. While not "deafening," it is a constant mechanical drone. If you are installing this near a patio or a bedroom window, we suggest using rubber vibration isolation pads under the condenser to reduce the structural noise transmitted through the house foundation.
Deep Dive: Step-by-Step Installation Guide
For potential buyers, the "DIY" aspect is the primary draw—and if you're still weighing your options, our MrCool DIY-24-HP-WIF115 Mini-Split Buying Guide provides a deeper dive into sizing and requirements. However, "DIY" does not mean "effortless." To ensure your warranty remains intact and your system operates at peak efficiency, follow this structured approach to installation.
Step 1: Site Selection and Planning
Before unboxing, map out your indoor and outdoor locations. The indoor unit should be placed away from direct heat sources (like ovens or fireplaces) and at least 6 inches below the ceiling for proper airflow. The outdoor condenser needs at least 12 inches of clearance from the wall and 24 inches of open space in front to exhaust heat. Crucially, plan your drainage route; since there is no condensate pump included in the standard kit, the drain line must slope downward the entire way to the outdoors. For more on managing home moisture, check our guide to managing basement moisture.
Step 2: The Wall Penetration
Cutting the 3-inch hole through your exterior wall is the most intrusive part of the process. We recommend using a hole saw with a slight downward angle toward the outside. This prevents rainwater from following the line set back into your home. Once the hole is drilled, the wall sleeve provides a professional finish and prevents pests from entering through the gap.
Step 3: Mounting the Indoor Air Handler
The included mounting bracket is sturdy. Use a level to ensure it is perfectly horizontal. If you have a slight tilt toward the drain hole (1-2 degrees), it can